Tally Integration

Landed Cost Calculation in Tally Prime

Optimizing Your Business with Landed Cost Calculation in Tally Prime

In today’s competitive business landscape, understanding the true cost of your products is crucial for maintaining healthy profit margins. One often overlooked component of this is the landed cost—the total cost of a product once it reaches your warehouse, including all additional expenses beyond the purchase price. This blog will guide you through what landed cost entails, its importance for your business, and how Tally Prime, enhanced with a custom TDL (Tally Definition Language) solution, can help automate and streamline this critical calculation. With these insights, you’ll be better equipped to optimize pricing, improve profitability, and gain a competitive edge.
What is Landed Cost?

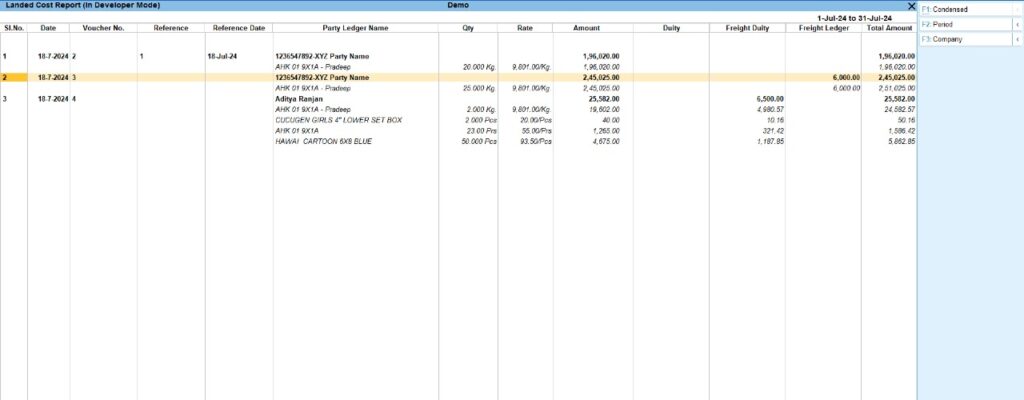
Landed cost refers to the comprehensive cost of acquiring a product, considering all expenses incurred until the product is available for sale in your inventory. This includes:

  • Freight Charges: The cost of transporting goods from the seller to your warehouse.
  • Customs Duties and Taxes: Government-imposed charges on imported goods.
  • Insurance: Coverage for goods during transit.
  • Handling Fees: Costs related to the movement and storage of goods within your facilities.
  • Miscellaneous Charges: Any other incidental costs such as port charges, brokerage fees, or inspection costs.

For businesses, especially those involved in importing goods or managing complex supply chains, accurately calculating the landed cost is essential. This ensures a realistic view of your total expenses, helping you set appropriate prices and maintain healthy profit margins.

Why Landed Cost Matters for Your Business

Accurately calculating landed cost is vital for several reasons:

  1. Enhanced Pricing Strategy: With a clear understanding of all costs associated with a product, you can set prices that cover these expenses while ensuring a profit.
  2. Correct Inventory Valuation: Properly valuing your inventory impacts your financial statements and tax obligations, making accurate landed cost calculation critical.
  3. Informed Profit Margin Analysis: Knowing the true cost of your products allows for better analysis of profit margins, aiding in strategic decision-making.
  4. Better Purchasing Decisions: Detailed cost insights empower you to make more informed decisions when negotiating with suppliers or evaluating alternative sourcing options.

Automating Landed Cost Calculation with Tally Prime

Tally Prime is a robust accounting solution, well-regarded for its ability to handle complex financial tasks. However, the default setup may not automatically calculate landed costs, necessitating manual entry and potential errors. To overcome this, businesses can leverage TDL—a powerful scripting language that allows for customizations in Tally Prime.

By implementing a custom TDL script, you can automate the calculation of landed costs, ensuring consistency and accuracy across all transactions. This automation not only saves time but also minimizes the risk of costly errors.

Step-by-Step Implementation in Tally Prime

To get started with this TDL and automate your landed cost calculations, follow these steps:

1. Create the TDL File: Write the script provided above and save it as a `.tdl` file.
2. Load the TDL into Tally Prime:
– Go to F12 > Product & Features.
– Select F4 (Manage Local TDLs) and load your `.tdl` file.
– Restart Tally Prime to activate the new features.
3. Using the New Landed Cost Feature:
– When recording a purchase voucher, a new field will appear for entering the landed cost.
– Simply input the relevant expenses, and Tally Prime will calculate the total landed cost for you.

This automation ensures that your accounting system consistently reflects the true cost of your products, leading to more accurate financial records.

Business Benefits of TDL Customizations

Incorporating custom TDL scripts into your Tally Prime setup brings several advantages:

  • Increased Accuracy: Automating calculations reduces the likelihood of manual errors.
  • Efficiency: Streamline the data entry process, saving time and allowing your team to focus on higher-value tasks.
  • Consistency: Ensure uniform application of landed cost calculations across all relevant transactions, improving the reliability of your financial data.

These benefits collectively enhance your business’s financial management capabilities, providing a stronger foundation for growth and profitability.


Addressing Common Challenges

Challenge: Businesses often face difficulties in managing fluctuating costs, which can complicate landed cost calculations.

Solution: Regularly update your TDL script or manually adjust inputs to reflect current costs. Advanced TDL solutions can also be developed to dynamically adjust these costs based on real-time data inputs, ensuring your calculations remain accurate and up-to-date.

Grow Your Business with Custom TDL Solutions

At ADISOFTTECH / PRADEEP RAY, we specialize in TDL customizations that empower businesses to get the most out of Tally Prime. Our expert team can develop tailored solutions that automate complex calculations, streamline your accounting processes, and ensure your financial data is both accurate and actionable.

Ready to enhance your business’s financial management? Contact us today to learn more about our TDL customization services and how we can help you achieve your business goals.

Additional Resources

For further reading and to deepen your understanding of TDL and Tally Prime, explore the following resources:

These resources will help you unlock the full potential of Tally Prime and explore the endless possibilities of TDL customization.


Optimizing Your Business with Landed Cost Calculation in Tally Prime Read More »

How to we select right software for our company

Selecting the right software for your company involves a careful assessment of your needs, budget, and the software’s capabilities. Here’s a step-by-step guide to help you through the process:

1. Identify Your Needs

Define Objectives: Clearly outline what you want to achieve with the new software. Are you looking to improve efficiency, streamline operations, or manage data more effectively? List Requirements: Make a detailed list of all the features and functionalities you need. This might include integrations with other software, user-friendliness, scalability, and specific modules relevant to your business.

2. Research Options

Market Research: Look into different software solutions available in the market. Consider both well-known options and niche solutions that cater specifically to your industry. Read Reviews and Testimonials: Check out user reviews and case studies to understand the experiences of other companies similar to yours.

3. Evaluate Compatibility

Integration with Existing Systems: Ensure the software can integrate smoothly with your current systems, such as accounting, CRM, and ERP solutions. Technical Requirements: Check if the software meets your technical infrastructure, including hardware, operating systems, and network requirements.

4. Assess User Experience

Ease of Use: Evaluate the user interface and overall usability. Software that is intuitive and easy to navigate will reduce the learning curve for your team. Training and Support: Consider the availability of training resources and customer support. Good support can be crucial in the initial stages of implementation.

5. Consider Scalability and Flexibility

Future Growth: Choose software that can grow with your company. It should be flexible enough to accommodate future changes and scalability needs. Customization: Assess whether the software can be customized to fit your specific business processes and requirements.

6. Evaluate Costs

Total Cost of Ownership: Consider both the initial purchase price and ongoing costs, such as subscription fees, maintenance, and support costs. Return on Investment (ROI): Estimate the potential ROI by weighing the benefits the software will bring against the costs involved.

7. Request Demos and Trials

Product Demos: Request demonstrations from software vendors to see the product in action and ask questions specific to your needs

Free Trials: Take advantage of free trial periods to test the software in your business environment and gather feedback from your team.

8. Make an Informed Decision

Consult Stakeholders: Involve key stakeholders in the decision-making process to ensure the chosen software meets everyone’s needs. Vendor Reputation: Consider the vendor’s reputation, history, and customer service track record.

9. Plan for Implementation

Implementation Strategy: Develop a detailed plan for software implementation, including timelines, responsibilities, and training. Monitor and Review: After implementation, continuously monitor the software’s performance and gather feedback for any necessary adjustments.

Conclusion

Selecting the right software is a strategic decision that requires thorough research and careful planning. By following these steps, you can ensure that the software you choose will meet your company’s needs and support your business objectives.

How to we select right software for our company Read More »

What Is Power BI How can we connect with Tally

Power BI is a business analytics tool developed by Microsoft that enables users to visualize and analyze data from a variety of sources. It provides interactive visualizations, business intelligence capabilities, and data preparation tools that allow users to create insightful reports and dashboards.
Here are some key features and components of Power BI:

  1. Data Sources: Power BI can connect to a wide range of data sources, including databases, Excel files, cloud services, online services, and more. It supports both structured and unstructured data.
  2. Data Transformation and Modeling: Power Query, a data transformation and preparation tool, allows users to clean, shape, and combine data from multiple sources. Power BI also provides a data modeling interface called Power Pivot, which allows users to create relationships between tables and define calculations using formulas.
  3. Visualizations: Power BI offers a rich set of interactive visualizations, including charts, graphs, maps, tables, and custom visuals. Users can drag and drop fields onto the canvas to create visual representations of their data. There are various formatting and customization options available to enhance the appearance of visualizations.
  4. Dashboards: Dashboards in Power BI provide a consolidated view of key metrics and data visualizations in a single place. Users can pin visualizations, reports, and live data tiles to the dashboard, allowing for easy monitoring and analysis of data.
  5. Reports: Power BI enables users to create interactive reports using a combination of visuals, filters, and slicers. Reports can contain multiple pages, and users can navigate between them to explore different aspects of the data.
  6. Data Refresh and Sharing: Power BI allows scheduled data refreshes, ensuring that reports and dashboards always display up-to-date information. Users can also share their reports and dashboards with others within their organization or publicly, and collaborate on the same content.
  7. Power BI Service: Power BI offers a cloud-based service where users can publish, share, and collaborate on their reports and dashboards. The Power BI service provides additional features like content packs, app workspaces, data gateways, and administration capabilities.
  8. Power BI Mobile: Power BI has mobile apps for iOS and Android devices, allowing users to access their reports and dashboards on the go. The mobile apps provide a touch-optimized experience and support offline viewing.
    Power BI is widely used by organizations to gain insights from their data, create interactive reports, and make data-driven decisions. It is suitable for a range of users, from business analysts and data professionals to executives and decision-makers.

How can connect Power Bi with Tally using ODBC

To connect Power BI with Tally using ODBC (Open Database Connectivity), you need to follow these steps:

  1. Install Tally ODBC Driver: First, you need to install the Tally ODBC driver on the machine where Power BI is installed. The ODBC driver enables the communication between Power BI and Tally. You can obtain the Tally ODBC driver from the Tally Solutions website or contact their support for assistance.
  2. Configure the ODBC Data Source: Once the Tally ODBC driver is installed, you need to set up an ODBC data source to establish the connection between Power BI and Tally. Here’s how to do it:
    a. Open the ODBC Data Source Administrator on your machine. You can find it in the Windows Control Panel or by searching for “ODBC” in the Start menu.
    b. In the ODBC Data Source Administrator, go to the “System DSN” tab and click on the “Add” button.
    c. Select the Tally ODBC driver from the list of available drivers.
    d. Provide a name for the data source, such as “Tally”, and enter the necessary connection details, such as the server IP address or hostname, port number, username, and password. Consult the Tally ODBC driver documentation or contact Tally support for specific connection details.
    e. Test the connection to ensure it is successful, and then click on “OK” to save the data source configuration.
  3. Connect Power BI to Tally via ODBC:
    a. Open Power BI Desktop on your machine.
    b. In the Home tab, click on “Get Data” and select “More…”
    c. In the “Get Data” window, search for “ODBC” and select “ODBC” from the available connectors. Click on “Connect”.
    d. In the “ODBC” window, select the data source name you created in the previous step, such as “Tally”, and click on “Connect”.
    e. Enter the required credentials, such as username and password, if prompted.
    f. Power BI will establish a connection to Tally using the configured ODBC data source. You can now select the tables or views from Tally that you want to import into Power BI.
    g. Once you have selected the desired data, click on “Load” to import it into Power BI.
    h. Power BI will load the data from Tally and allow you to create visualizations, reports, and dashboards based on that data.
    By following these steps, you can connect Power BI to Tally using ODBC and leverage the data from Tally within Power BI for analysis and reporting purposes.

What Is Power BI How can we connect with Tally Read More »

Bill Type – On Account Block in Tally Transaction

On of the Mager challenges in Tally for doing the on account transaction. If the Tally user creating on account transaction then Bill wise Outstanding Report display wrong information. for Example : – If Party ABC & Co. Payment the advance payment like Rs. 5000/-. if the tally data entry user, are entre this transaction with on account then we don’t have option to adjust this amount to any bill.

we need to changes receipt transaction again and modify this bill line details. Other wise Bill outstanding Report will display Wrong information.

for over come this Problem we are provide one Tally addons where you can block on account transaction. so that tally data entry operator will not able to select on account bill type. and your Bill wise Outstanding Report will work Properly.

This is the simple addons we are provide free for our customer. No need to pay any additional amount for this TDL.

Just you have to Email your Serial No along with your name and contact Details this this email id : -adisofttech22@gmai.com. Or Just comment on This post with your email id our team will connect with you.

No Hidden charges for this TCP file.

for any Type of Tally customization Please connect with us. ADISOFTTECH – TALLY CUSTOMIZATION COMPANY

Bill Type – On Account Block in Tally Transaction Read More »

Gst 2B Reconciliation in Tally

Gst 2B reconciliation in Tally using Json Or ZIP file.

Just download JSON Or ZIP From Your GST Portal and Match Your Tally Data on Single click.

Report will Show GST Number Wise tax as Per Tally Vs As per GST portal.

If GST Data is Not available in Portal you can connect with your Client.

If Data is available in Portal and Not available in Tally Then you can make transaction in Tally.

if data Is partial match Like as per Tally 1000 and as Per Portal 850 then you can also see the different.

GSN Number Wise Tax Different you can Find.

Gst 2B Reconciliation in Tally Read More »

Party Wise Product Wise Rate and Discount

We are provide very interesting addons in tally . you can set Party Wise product wise rate and discount in Tally.

Example : – for example ABC Company want to fixed Product Rate and Discount Party Wise then is addons can use. at the time of sales billing rate and discount will copy as per party master set. if you didn’t set Rate or discount in Party master Then normal tally function will work.

We are also provide excel utility to update the product rate and discount in Party Master.

you can update product Rate and discount using this screen.

Just Like Maintain Price List Party Wise.

Party Wise Product Wise Rate and Discount Read More »

Lock / Unlock Tally Transaction

 We are providing a very interesting and important addons in Tally. After Complete for Audit / GST Filling Lock your Transaction. No one can edit / Change your transaction.

Case: – suppose you match your passbook with your tally transaction after that any user are edit /Alter your transaction then you are facing very big issue, again need to match each transaction. Or suppose After GST Filling any user change the transaction or alter the transaction then same issue will occurs. Again, need to match each transaction.

Over come this issue we are providing a special addons in Tally so, you can lock and unlock your transaction. Admin can lock the transaction after that no one can edit / Alter This transaction. suppose admin want to unlock particular transaction then they can do, After Alteration they can again lock the same transaction.

Special Feature: -

*  Single / Multiple Transaction lock same time.

* Lock or unlock transaction form Daybook / GST Details Report.

* Report form Lock and unlock transaction.

Lock / Unlock Tally Transaction Read More »

Unlimited Level Of Voucher Approval

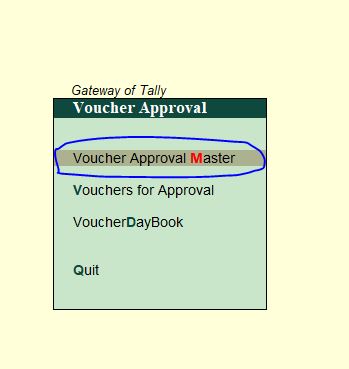
We Creating New addons in Tally. Administrator Can Create Number of Approval in Tally as per company decision.
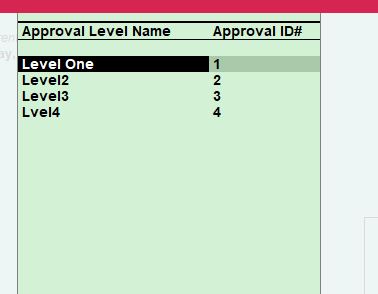
for Example if company XYZ PVT LTD want to implement Transaction Approval in your company Then they create Number of approval then want to use. we are also share screen shot how they will be create level of approval.

User Approval Level

ID Will Be auto Generated as Per Approval Level.
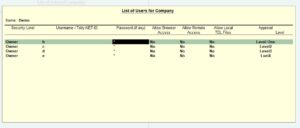
After That user Creation screen mark user level as per screen.

Approval function will work .

One Important Point if admin and last level of approval do transaction Then no need to approval. if Level one will do transaction then level two and level three will approve. and we are also provide Approval History Report.

Unlimited Level Of Voucher Approval Read More »